When I get a call from the Wife during the day it means one of 2 things. Someone has been hurt or something is broken. Luckily for me, it was the latter. I really didn’t want to spend my afternoon in A&E with one of the kids.
Upon hearing in great detail on how her 2011 Ford Grand C-Max 1.6tdi wouldn’t start and “just make this clicky noise”, it was pretty obvious that the battery was at fault. I was over in Peterborough, so I popped it at Milfiled Autos for a new battery. £80 later (when the f**k did batteries get so expensive?!) I was on the way to swap out her battery and drive it home. Like most “simple” tasks I undertake, it’s wasn’t going to be that easy.
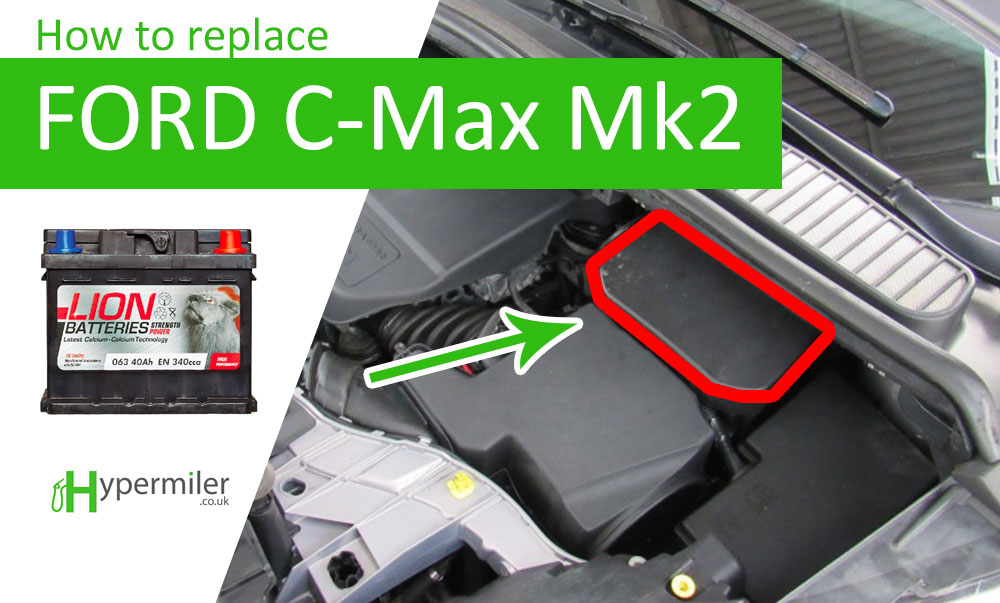
Under the bonnet of the C-Max you might first think that at the battery was located in the boot. Nope, they just put it as far back as they can and make it as awkward as possible to get at. Since I was only equipped with some basic spanners, I opted to jump it using the VRS and head home to get wrenching.
On this unfortunate occasion, YouTube was of very little help but I managed to find this little gem hiding away on a Ford owners club form website.
Battery Replacement Guide
Note that there may be some minor differences between the images below and your C-Max. The front of our battery case was a little different and so were the intake pipes. I suspect that this wasn’t the same engine as ours but the procedure was the same.
TOOLS REQUIRED:
- Phillips cross-head & flat head screwdriver
- 10mm (preferably a deep reach socket), 8mm and 7mm sockets
- ¼” Drive ratchet handle with a 2-4” extension.
[ad]
BATTERY REMOVAL PROCEDURE:
Remove the Engine Cover (1). Remove the Battery Cover (2). Unclip the Radiator Cover (3) rear clips (dashed boxes), and loosen the stud fasteners (circled).
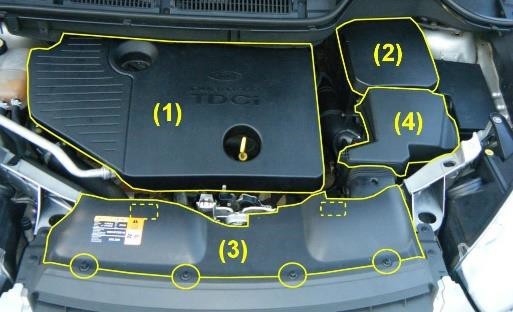
Lift the back edge of the Radiator Cover (3) up so that it is free to move above the air intake pipe that goes from under it to the Air Filter Box (4) – We’ll need this to be free later on to give us some “wiggle room”.
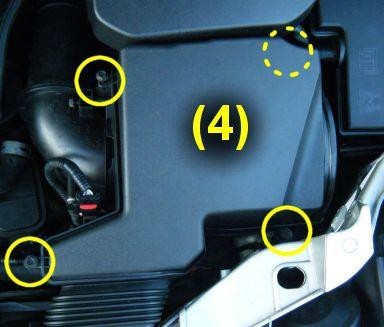
Remove the Air Filter Box cover (4) by loosening the four 7mm bolts until they are free to turn by hand. The bolts do not need to be removed completely as they should stay attached to the Air Filter Box cover when removed. Now lift the cover upwards to remove it.
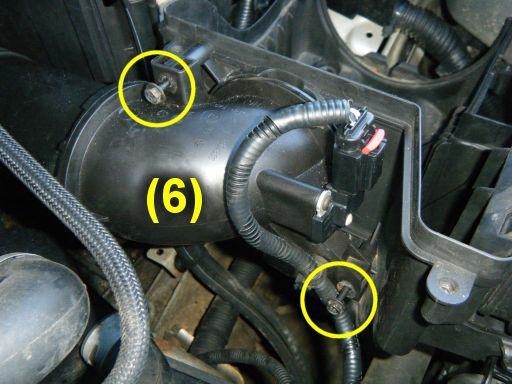
To remove the Air Filter (5), lift the right end (marked *) upwards (looking rearwards). This will release it from the Air Intake Pipe (6). If your filter looks a bit brown like this one (and is full of dust and fluff), I’d advise on replacing it soon.
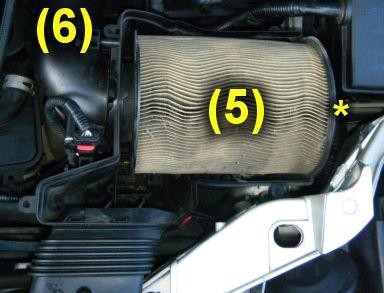
Now undo the two 7mm bolts (circled) attaching the Air Intake Pipe (6) to the Air Filter Housing, so they are free to turn by hand (as per step 3. No need to remove them fully). Pull the Air Intake Pipe to the left (looking rearwards) to release it from the Air Filter Housing.
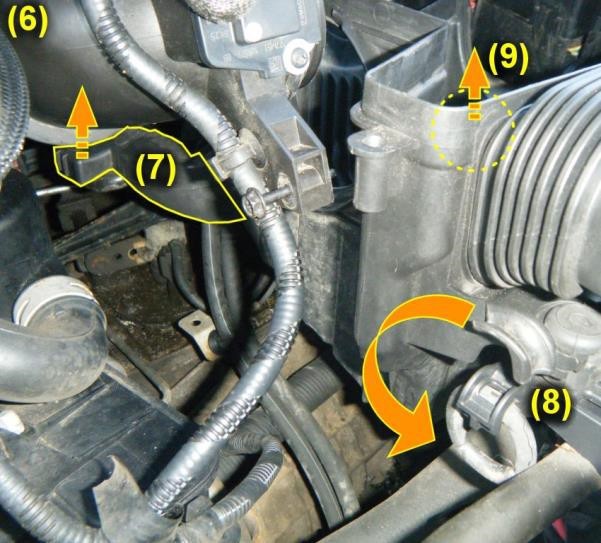
Lift the Air Intake Pipe (6) upwards slightly, and underneath it you’ll see an arm (7) coming off of the Air Filter Housing (9). Pop the arm off of the metal bracket below it by pulling it upwards. Do the same for the other pop mount (dashed circle near the “(9)”). This will make it easier to release the big rubber band (8), which is shown released in the picture. NOTE. Our C-Max had a flexible pipe going to the intake pipe – we recommend that you remove this fully using the flat blade screwdriver to losen the hose clamps.
Now for the fiddly bit! Pull the forward Air Intake Duct upwards (the one that goes under the radiator cover), so that it disconnects from the Air Filter Housing (9) … then wiggle, twist and lift the Air Filter Housing (9) so it comes out. You may need an extra pair of hands to hold the Air Intake Pipe (6), as well as the forward Air Intake Duct out of the way.
Nearly there! Pop all of the wires out of the clips on the Battery Front Cover (10).
Disconnect the Battery Positive Terminal Connector by loosening the 10mm nut (circled) until you can easily lift the Connector free of the Battery Terminal. Pull the Battery Terminal Connector towards you so that it does not touch the Battery Terminal when you release it.
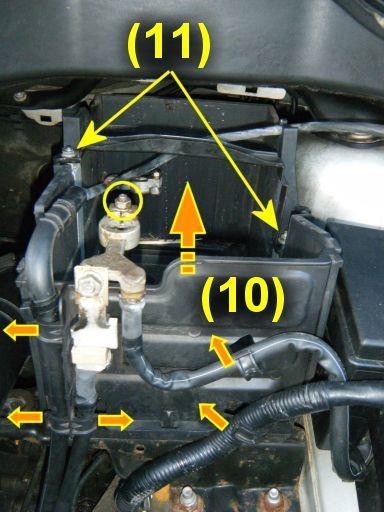
Wiggle and lift the Battery Front Cover (10) out of the way – it should come out easily.
Loosen / remove the two 10mm nuts (11) that hold the Battery Retaining Bar against the Battery. Remove or reposition the Bar so the Battery is free to slide forwards.
Push the wires at the front of the Battery downwards / to the side and slide the Battery towards you until you can reach the Negative Terminal Connector. Remove the Negative Terminal connector in the same way as you removed the Positive
Terminal Connecter (loosen the 10mm nut).
Slide and lift the Battery out, lift it over your head and scream like a warrior in battle. You have won.
Slide in the new battery making sure that the negative terminals go in first. Reverse the steps and trust me. It’s a lot easier to put back in!
Why oh why?
I’m pretty handy with the spanners and this was not a pleasant job at all. Due to some of the tools you require, the job might be out of reach for many owners who don’t have the right sockets or confidence to start engine components pulling apart. I really don’t understand why Ford made it so difficult to replace, is it just to keep their technicians in a job. Hopefully, this guide will help you have the confidence you need to swap out the battery without too much bother and save you a few quid in the process. I’m just glad that the battery replacement of our Mk3 VRS is much easier!
Do you want a video?
Do you want a video of the process? I’d be happy to put one together – it certainly would have helped me a little. Let us know in the comments below.
Credits & Downloads
ford-cmax-Battery_Replacement-mk2-2003-2010 & thanks to ww.soulgfx.com to writing the guide.


What a fantastic piece of information on how to change a battery in a ford c max been in the car trade for some years and this is the best I have seen well done you, have saved page to show others
Hi Stephen
Thanks for the feedback. I hope this article has proved useful to you.
Cheers Karl
Many thanks for producing this article! What a life saver.
I could find no information online for how to replace the battery on C Max mk2 petrol despite them being so common and would have given up without this article.
With a £20 socket set and a £60 battery I was able to complete the steps in 2 hours.
On the petrol model I found that you still have to remove the air filter and the correct size battery was 240mm (not 270).
Very glad you found this article useful. It wasn’t a pleasant job was it?!
I really don’t get why they made it such a pain to do.
Thank you for the heads up, and the excellent advice and pics
Got me through this tedious job in about a hour, originally thought it would take about 15 minutes!
Much appreciated
thank you for this. very helpful.
Typical problem with new cars. What used to be simple, is not any more!
Spark plugs would also be difficult to remove. Even pouring oil is not handy!
I guess all this is Business related.
Yep, back in the day anyone could replace a battery or routine maintenance. I just did a full service on the car and it really wasn’t fun!
Great set of instructions, thanks! One observation: I noticed the list of tools required included an 8mm nut socket. Although the instructions don’t mention the use of one fortunately I bought one anyway after finding a flexible driver was essential – just in case. My 2016 C-Max 1.5 diesel has 8mm nuts fixing the air intake pipe so that instruction ideally should be corrected.
I’m about to attempt this tomorrow and will report back.
Good luck Mike. It’s a pig of a job 🙁
Super Karl – far better described and illustrated than the Haynes manuals of my youth.
A FANTASTIC summary on how to change a battery in a ford c max.
The most telling comment is the Why Oh Why? Perhaps Ford think that the rest of the car will not last the lifetime of a battery.
Next lockdown idleness battery replacement job is a mini – similar issues!
Well done.
Hi Tim
Glad you found the article useful, I really don’t get why they did it! Good luck with your Mini 🙂
Cheers Karl
Hi thanks this has been helpful, I would love a video to see it being done.
Excellent aid for replacing the battery on my 180,000 mile tdci. Next job is thermostat, which unfortunately needs all of the above, and removal of the battery tray as well. Looking forward to warmer weather than -5 for that!
Most helpful advice I have found so far and hopefully all will go well when I tackle the job.
Also, I’m pleased that no mention is made of re-coding the radio or ECU due to disconnecting the battery which may be the case for some C-Max models with a stop/start feature, something I was dreading.
Thanks, I am about to get a new battery (2.0TdCi stop/start) and over £150 quid now Aug 24. Had an idea it would involve removing the air filter and other parts. This seems detailed enough to ensure a good change over. The one thing that puzzles me is that ford have made it so you have to disconnect the positive terminal first (you can’t get at the negative terminal). This is usually bad practice as it is possible to contact a ground chassis point with the spanner whilst undoing or tightening the positive terminal. Where possible the negative (earth) should be first off, last on. I will insulate my spanners.
Ok, I changed my battery yesterday, EFB type. On my model ford 2016 Grand CMax 2.0 TDci econetic. I found there is no need on mine to remove the radiator cover (missing?) or engine cover. If you undo the two screws on the air intake pipe to the air filter box, push the air intake pipe aside and then release the rubber band to the filter box where it connects to the front grill, the air box can be pulled up out of the two grips underneath and put to one side without undoing the 4 screws that hold the lid.
on mine the front of the battery box is a specialised junction box. The top has the positive cable to the battery. Remove positive terminal from battery (take care, use insulated spanner). Then disconnect two cables connected to bottom left of the panel ( 10mm and 13mm). You can now slide the panel up and prising the battery box side panels aside pull the front forward so it swings on the cable to the fuse box. Undo the top battery clamp and then slide battery out to access negative terminal and remove connection to post. The battery can now be lifted out.
Refitting is the reversal of above and as the author of the original post states a lot easier and quicker. Well it would have been, if my small 1/4″ drive socket set ratchet spanner hadn’t at that point decided to turn into a spanner – Ratchett jammed.
Apparently the battery has to be registered with the cars on board cpu (ecu). The advice is to have the battery installed by fords or auto electricians to ensure charging is correct and functions like stop/start work ok. Others say if you leave for 8hrs overnight the ECU will cycle enough to calibrate the BMS battery monitor on its own. There are videos online showing dash button sequences to press to calibrate if you cant wait. My cars functions, all seem ok including stop/start and I shall be checking the charge level over the next few days to ensure all is well.
Thanks to Hypermiler for posting the original, as others have said there isn’t much out there showing the pitfalls and forwarned is forarmed making the job a lot easier. I have chipped in, as my model is slightly different to the one shown.
Thanks for this. My variant of cmax was slightly different than the one described, however, reading this gave me the confidence to have a go.
Worked out fine and yes why oh why did they put the battery there!?
Thanks again.
Great post! I found the step-by-step instructions really helpful, especially the tips on handling the battery cables. Replacing my C-Max battery felt less daunting after reading this. Thanks for sharing!
Great step by step guide. Thanks for saving us a lot stress trying to follow useless YouTube videos, or shelling out to have it fitted at local garage.
Searched almost everywhere for a guide on this and eventually came upon your page. Perfect description of each step and made a hard task a lot easier (still annoying awkward) and helped save me mechanic costs.
Thank you for this brilliant guide. It gave me the confidence to tackle this job. It took me a couple hours mainly because I had to drill out a seized bolt on the airbox. I encountered a few small variations in the shape and layout of the airbox and battery front cover in the 2011 mk2 1.6tdci C-Max I did the battery change on, but the procedure and steps in your guide still worked perfectly.
Removing the oil filter also requires full airbox removal, so if I was doing this job again I’d plan to do the oil and filter change at the same time. Probably worth popping in a new air filter while you’re at it.
Thanks again for the time you invested in this guide.
Thank you so much for this guide – it was a lifesaver when I was trying to work out what the hell Ford had done with this engine bay. I don’t know what’s worse, the battery placement or the coolant reservoir where they decided that the best place for the filler cap would be buried as far as possible under the cockpit bulkhead rather than on the end near the front. Genius.
Anyway, your guide is excellent but I noticed a minor variation in my model (2015 2.0 diesel) where it’s a bit easier to split the air intake hose if you remove a clip – no need to remove rad cover etc. I took some photos but now realise it’s not possible to attach photos to comments here so if you still want contributions to this post after 6 years (you should, it’s excellent!) let me know and I’ll send them.
Thanks again – you’re the best!